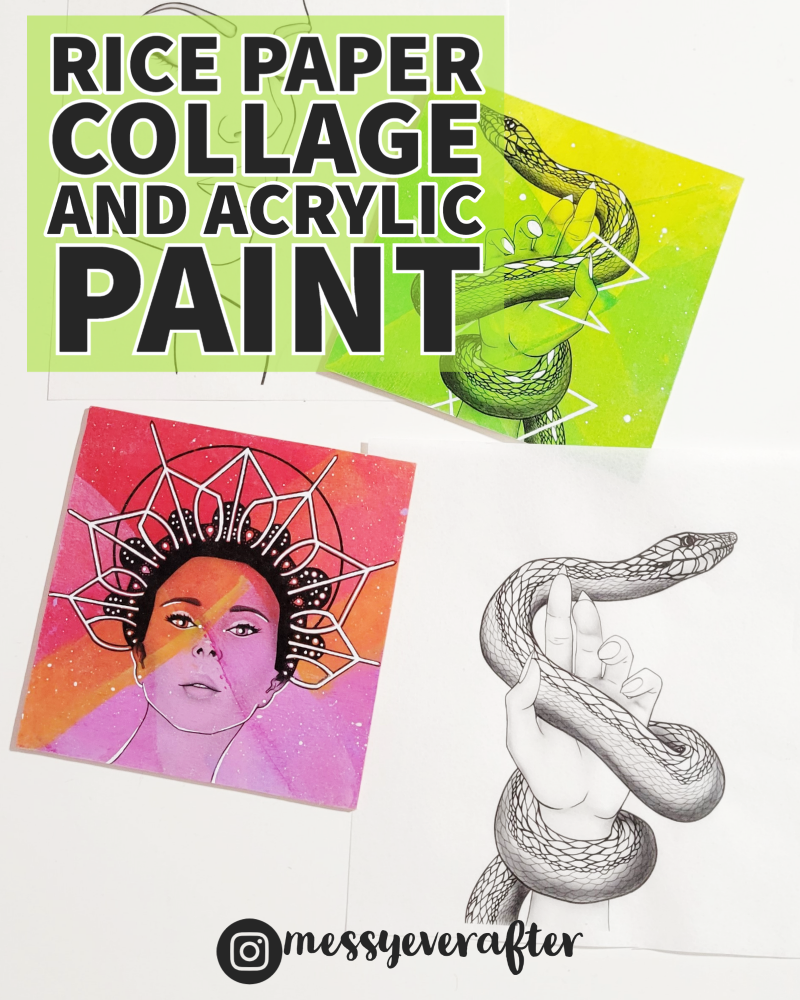
I have been playing with this new art collage technique for over a year now, and I am obsessed.
Back in 2009, I had an art instructor in college that showed us a Xerox transfer technique. You make a photocopy of anything you want, then you transfer the ink onto your art surface using wintergreen oil. My 15-minute class experiment turned into one of my favorite pieces of art for years. Since then, I have been on a passive mission to find ways to transfer images without poisoning myself with wintergreen oil.
I officially found my new favorite transfer technique which is actually more like a collage. And this art collage technique has opened my world to new ways of constructing art. Here is one of the most recent creations:
Art Collage with Drawings and Photographs
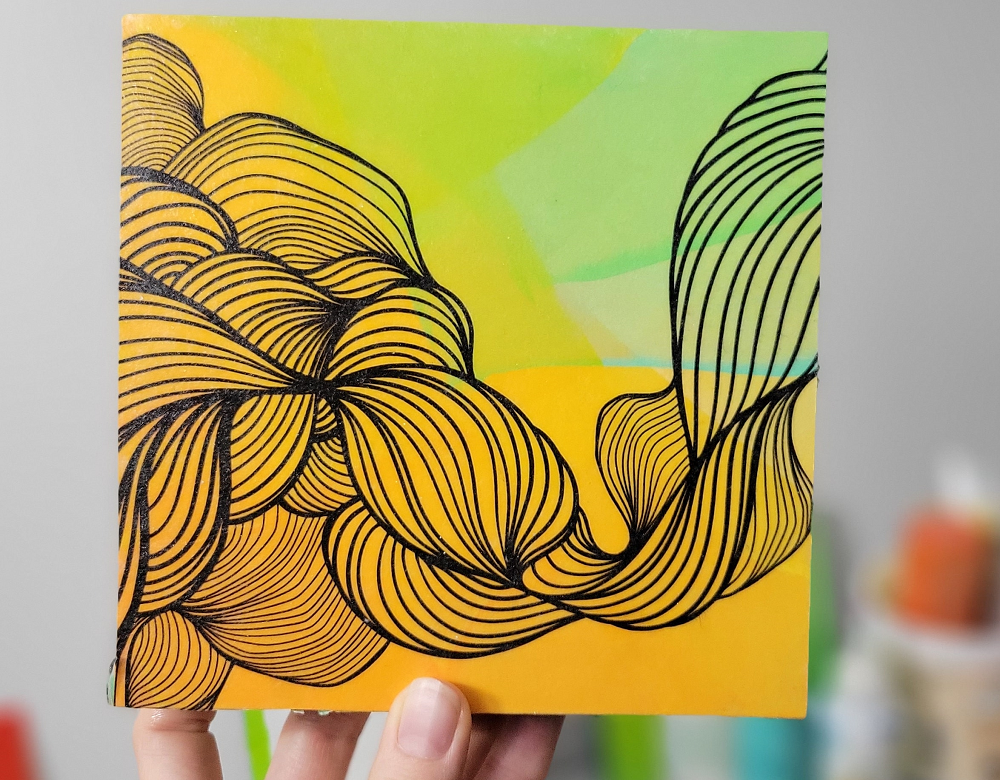
As you can see from the sample above, I started with a digital drawing, printed it, and then applied it to a wood panel, but I experimented with this technique using photographs first. In the example below, I took a photograph of my hands, used Photoshop to apply a half-tone effect, and then printed it on rice paper, before applying it to a prepainted canvas.
Unlike using a photo transfer method where your image is unlikely to transfer perfectly, or a more typical collage where you have clear boundaries between pieces, this method allows for natural layering. This collage technique allows you to build layers in your work that blend together almost seamlessly. You could even use images on multiple pieces of rice paper to create more depth and complexity. These examples of mine are only a taste of what can be created.
Do you feel inspired? I want you to try this.
Here’s everything you need to try this art collage technique:
This isn’t exactly a cheap and easy technique. There’s a fair amount of supplies, finesse, and skill that goes into a polished final product, but you can take little snippets of this and go down your own path.
*Links contained in this post are affiliate links for Amazon and/or Blick Art Materials and I will earn a commission if you make a purchase at no additional cost to you. These commissions help fund more content like this, so thank you! Also, if you enjoy this blog post, consider leaving a tip through Ko-Fi to support my blog as a whole.
Supplies for Rice Paper Collages
The Rice Paper:
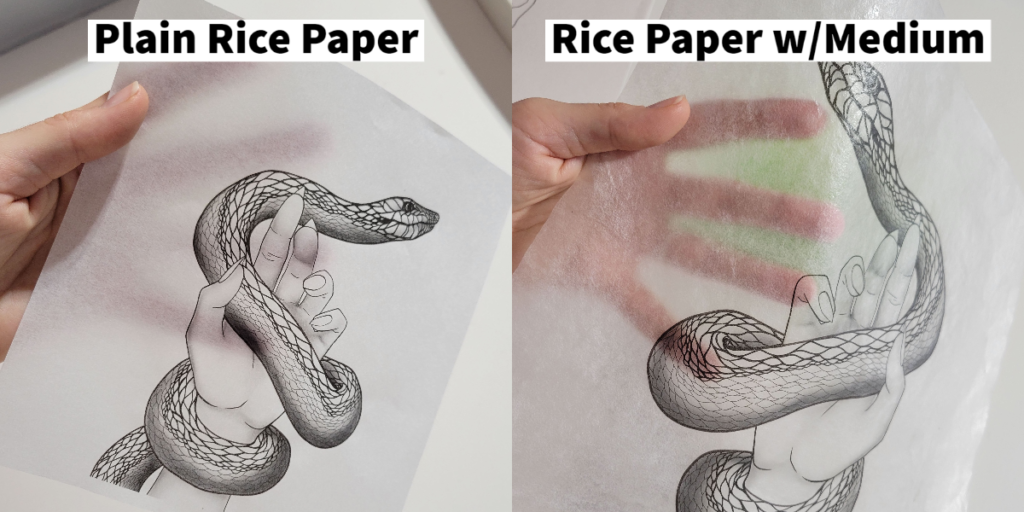
The paper is super important for this technique. It needs to be thin yet durable, be able to run through a printer, have a transparent quality to it, and not buckle and warp when soaked in water or adhesive. I was lucky that I had a pad of rice paper on hand from an experiment years ago that checked all the boxes so my first try at this collage technique was a success.
- 12″x18″ Rice Paper Pad: Hobby Lobby <– Not an affiliate link
Start with this rice paper. Don’t try to use any substitutes until you see how this one behaves. I tried a few other papers months ago to see if I can get different opacities and effects, but after trying a laser jet vellum that bubbled and warped like crazy as I tried to adhere it to my wood panel, I just ordered three more pads of this exact rice paper brand.
The Printer:
Because I already have a couple of printers at home for my business, I tested the rice paper on my inkjet printer that I use for fine art prints. I recommend using an inkjet printer that has a manual feed so the paper can be fed from the back and not have to get sucked through rollers or get pulled from a bulk tray. The rice paper jammed by Brother Laserjet over and over again because it traveled through rollers, but it slides through my Canon Pixma Pro 10 printer without any issues.
For longevity or your art, a pigment-based printer is a much better option than a dye-based printer. This Canon model uses pigment inks and will resist fading over time.
No Printer?
You have a couple of options here. You can go to a local print shop with your print files and see if they can help, or you can go the manual route and draw directly on the rice paper by hand. Rice paper is great for inks. The paper is translucent enough that you can trace an image onto it.

The Surface:
My preferred surface when working with the rice paper collage technique is wood. Canvas also works, but wood allows for the smoothest application of rice paper. These are the products I regularly use and love from Blick Art Materials.
The maximum print size for the rice paper is 12″x18″(minus print margins), so I use surfaces that are at least an inch smaller than that on each side.
The Adhesive:
- Liquitex Gloss Medium: Amazon OR Blick Art Materials
This is where the magic happens. Rice paper when dry is still pretty opaque, but when you adhere it to whatever surface you prefer with Liquitex Gloss Medium, it goes almost entirely transparent. For example, this piece below is on a wood panel. I first painted the acrylic background and then I “glued” the rice paper with the black design onto the surface using the gloss medium, and the rice paper became almost entirely transparent.
Don’t use expect the same results from another adhesive.
The material you use really matters with this art collage technique! Like the rice paper, I had Liquitex Gloss Medium on hand and used it for my first experiment. The results were perfect. But, then I tested PVA Glue and another brand of acrylic medium, but neither led to as transparent of an effect as the Liquitex Gloss Medium. The PVA glue performed the absolute worst, leaving the paper almost entirely opaque. Had that been my first experience, I likely wouldn’t have continued with this technique.
Moral of the story: Use Liquitex Gloss Medium before you try other adhesives.
Basic Directions for the Rice Paper Art Collage Technique:
1. Create your design:
For my latest work, I used Procreate on my iPad to make original drawings. You can also use photographs. If you are an artist selling your work, I highly recommend using original references as much as possible. If you are a hobbyist and just want to have fun, then sourcing designs from somewhere else is okay. (Read: Are You Stealing From Other Artists)
Your design doesn’t need to be black and white or have crisp lines! The sky is the limit with your designs.
2. Print Your Design:
Cut your rice paper to the size of your surface plus an inch on each side. I was working with 6″x6″ wood panels, so I cut my paper to 7″x7″. When printing with the Canon Pixma Pro, I used the Print Studio Plugin to resize the design on the paper. You may need to play with your printer and settings to get the formatting to work.
You can also cut the design out of the rice paper instead of using a sheet that covers the full surface, but you’ll be able to feel the edge of the paper on your surface a bit. I prefer one continuous and flat application that goes all the way to the edges of my work surface–but again, that’s just my preference.
3. Seal the Ink:
When you print a design onto the rice paper with inkjet ink, there is a high risk of the ink smudging when you apply it to your surface. The ink can handle a swipe or two from a brush, but when working over one area too much, the ink gets a little messy. This is why I seal the paper before I glue it to my art surface. You can do this two ways.
- Use a spray varnish (do this outside!): Krylon UV Resistant Clear (Amazon or Blick Art Materials)
- Apply a layer of Liquitex Gloss Medium to both sides: This process requires more finesse. I apply a diluted (medium and water) mixture to both sides until it’s completely saturated. Don’t overwork the ink though. Try to do one or two passes over each area. Then I hang the paper to dry by two little strips of masking tape on the top edge corners. The spray stuff is easier, but the gloss medium can be done inside without toxic fumes.
4. Prepare your surface:
Before I begin painting, I tape the edges of my wood panel or canvas to keep them clean with a painter’s masking tape since a lot of medium will be running down the sides in later steps. Then I paint. When I prepare my surface, I use the same acrylic techniques that I use on my abstract pieces. Acrylic paint, Catalyst Wedge, bold colors, etcetera. The only consideration I want you to have is to make sure the surface doesn’t have any texture once dry. That will make it harder to get the rice paper to lay perfectly flat.
Once you have your desired background, let it dry completely.
5. Glue the rice paper to the surface:
When I am using the Liquitex Gloss Medium, I make a diluted mixture and store it in a squeeze bottle for easy application. I think I do about 2 parts medium and 1 part water.
- Squeeze Bottles: Amazon
- Scraper/Squeegee: Amazon (I haven’t used these ones exactly, but any soft scraper can work.)
- Cheap Brushes: Blick Art Materials
To apply the rice paper to my surface, I do the following:
- I lay my design over the surface to see where I want it to be positioned. Since the initial application of gloss medium makes the rice paper more translucent when it’s dry, I’m able to see where colors will pop through before gluing it down.
- Remove the paper and grab the medium mixture.
- Squeeze a generous amount of medium mixture onto the surface and spread it evenly to the edges of the surface with a cheap brush. You do not want this to start drying quickly so it’s best to have a little bit of pooling.
- Lay the rice paper down and apply more medium mixture to the top of the paper. I gently brush this over the surface until every part of the rice paper is moistened. Again, pooling is better than tacky thin layers.
- Next, I take the plastic/silicone scraper and start working out excess medium and air bubbles from between the rice paper and the surface. I start from the middle of the paper and slowly pull the rice paper at the edges as I scrape medium and air toward the edges. If wrinkles form in the paper, you can lift the rice paper and scrape in another direction to smooth them. If areas begin to dry before the bubbles are worked out, apply more medium. This is the most difficult part of the process.
- Once the rice paper is smoothly adhered to the surface, I take an Xacto knife and cut off most of the excess rice paper at the edges to prevent the paper from pulling up as it dries. I don’t try to be perfect here.
- I allow the paper and surface to dry completely.
- I take the Xacto knife again and slowly trim the remaining rice paper from the edges to get it perfectly squared up and I pull off the masking tape.
The Finishing Touches to My Art Collage Technique
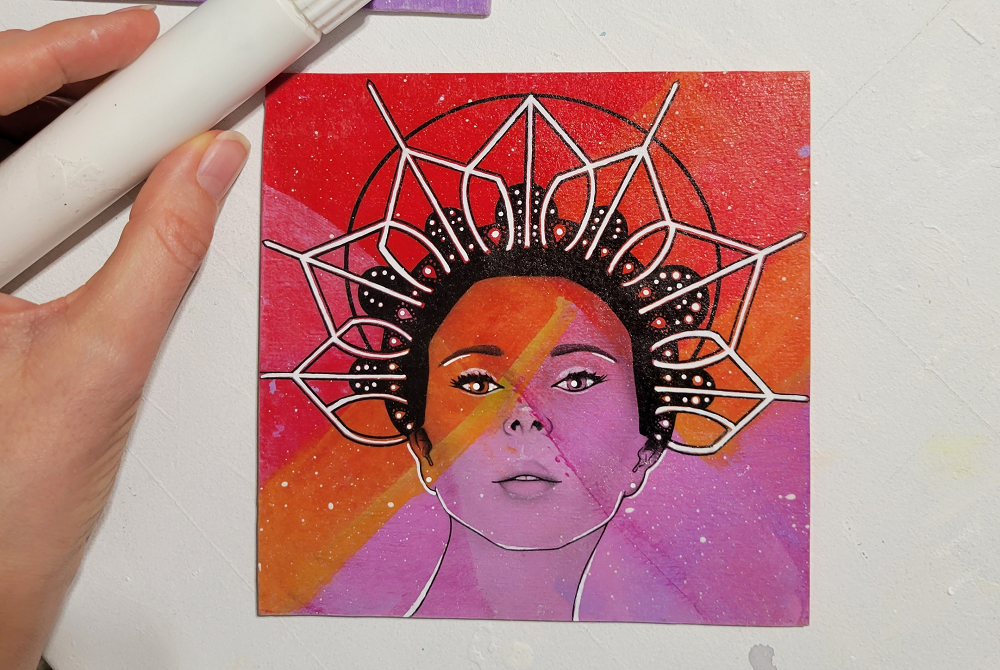
If you know me and my art at all, you know I can’t resist embellishing with my Fineliner. Once my rice paper design is fully dried and the edges are cleaned up, I add the finishing touches to my work.
There you have it. My latest obsession.
Anywho, please leave questions and comments below while commenting is open or reach out to me directly through Instagram or email. I’d love to hear from you and see what you create with this art collage technique! Feel free to tag me on whatever social channel you use if you give it a try! Make sure to sign up for my email list below to never miss a blog post.
-Kelly
PS, if you find this content helpful, consider tipping me through the Ko-Fi widget below or go to my Ko-Fi site for free/pay what you want wallpapers!